Populace Page Guide: Difference between revisions
Created page with "=Building Your Populace Page= First, find your page. If you had a http://wimble.outlandsheralds.org/ Wimble Herald entry as of July 26, 2025, a placeholder page has already been made for you." |
m →Without an Imported Wimble Entry: updated example populace template code with the new title/pronouns call |
||
| (10 intermediate revisions by the same user not shown) | |||
| Line 1: | Line 1: | ||
[[Category: Help]] | |||
=Building Your Populace Page= | =Building Your Populace Page= | ||
To edit any page on the Unofficial Outlands Wiki, you will need to create an account and be logged in. Once you have done so, proceed. | |||
==From an Imported Wimble Entry== | |||
First, find your page. If you had a [[http://wimble.outlandsheralds.org/ Wimble Herald]] entry as of July 26, 2025, a placeholder page has already been made for you. | First, find your page. If you had a [[http://wimble.outlandsheralds.org/ Wimble Herald]] entry as of July 26, 2025, a placeholder page has already been made for you. | ||
To find your placeholder page, follow these instructions: | |||
* In the searchbar at the top of every page, type in the name registered in Wimble, or a part of it, or your Wimble PersonID. Include any diacritic marks. Wiki is also particular about capitalization. | |||
:* There should be a list of results. Click on your page. | |||
* If you have not edited your page yet, you should see something somewhat like this, except with your name at the top, and if available, your device as pulled from Wimble: | |||
:: [[File:PopulaceBoilerplate Screen help.jpg|500px]] | |||
:* Now you can edit individual sections, via the blue edit button next to each section title, or the entire page (including what is in the infobox on the right) via the Edit button at the top right of the page. | |||
:: [[File:PopulaceBoilerplate Screen helpedit1.jpg|500px]] | |||
:* You will now see a page with a text box, like so, if you clicked the Edit at the top of the page. | |||
:: [[File:PopulaceEditPage screen.jpg|500px]] | |||
:: Otherwise you will see a textbox with only the contents of the individual section you clicked edit for. In order to add or delete sections, you will need to use the whole-page edit link (the one at the top of the page). The instructions for either is otherwise the same. | |||
::* Important: Do not delete the section beginning <nowiki>{{Populace and continuing to the next set of }}</nowiki>. That will delete the entire side infobox. We would like to retain them for uniformity of Populace page layouts. You may remove individual sections within, if you like. | |||
::* For markup text tips and tricks, skip the next section and continue reading. | |||
::* Once you have edited your page to your heart's content, for the moment, do not forget to remove the import tag <nowiki>[[Category:Populace Not Filled]]</nowiki> from your page, as you have now filled it! You should find it between the Populace template brackets and the Introduction section, though Category tags may be added at any point within the page. | |||
==Without an Imported Wimble Entry== | |||
'''Please check for an imported page before creating a new page.''' | |||
The simplest method for creating a new page for yourself is to link to it from your user page, save your new user page, then click the red text you've just created to create your populace page. The steps are similar. | |||
* Clicking your (red or blue)username in the top right will lead you to either an editable text box (if your username was red) or your user page (if it was blue). Click edit on your page if it is there, otherwise go to the next step: | |||
:* [[File:Userpage edit screen.jpg|500px]] | |||
* Within double brackets, like so: <nowiki> [[here]]</nowiki>, type your Populace page name (your SCA name), with correct spelling and diacriticals, as it should appear in Wimble Herald. Wiki is particular about capitalization, so be conscious of that as well. Save your user page changes. | |||
:* This will appear as red text in your user page. Click it to create your Populace page. | |||
:* Copy and paste in the following Populace template to create your side infobox: | |||
<code><nowiki>{{Populace | |||
|photo = [[File:Photo needed.jpg|200px]] | |||
|photocaption = Caption Needed | |||
|title = | |||
|pronouns = | |||
|location = | |||
|status = | |||
|opid = | |||
|device = [[File:Device needed.jpg|200px]] | |||
|devicecaption = Heraldry Needed | |||
|awards = | |||
|offices = | |||
}}</nowiki></code> | |||
:* When/if you are added to Wimble Herald, your PersonID (found at the end of the URL for your page) can be copied into the opid field. Instructions for uploading image files for your photo (optional) and device can be found further down this page. | |||
:* If you so desire, copy and paste the source code (found after clicking Edit or View Source) from the [[Populace Boilerplate]] to help get you started with suggested sections and information to fill out. | |||
==Editing Your Populace Page== | |||
===Uploading Images=== | |||
* On the left side of the wiki, under the heading "Tools", is the text "Upload File". | |||
* Your screen will look like this: | |||
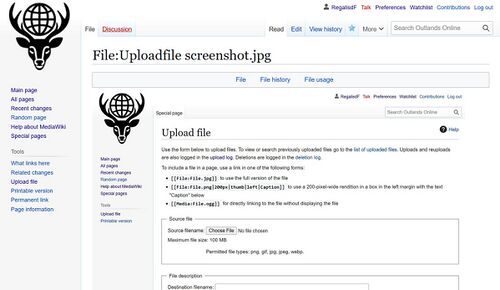
::[[File:Uploadfile screenshot.jpg|500px]] | |||
:*Click the "Choose File" button and select the image you want to upload. In the "Destination Filename" text box, you may rename your image for display on the website. A reminder that all images will be publically viewable to anyone who visits the Outlands Wiki. | |||
::* Your screen will now look like this: | |||
:: [[File:Uploadcomplete screen.jpg|500px]] | |||
:* Select and copy the "File:<filename>" at the top of the page - that is how you will display your images elsewhere. | |||
::*If the image is for the Populace Infobox, make sure to include " |200px" at the end of your file line, after the .jpg or .png (etc) to limit its size to 200 pixels. That will make sure it does not take over the page. As an example, all screenshot images on this page are limited to 500px with the same formatting. | |||
===Formatting Text=== | |||
The Outlands Online unofficial wiki uses [https://en.wikipedia.org/wiki/Help:Wikitext# Wikitext] markup language, which is [https://en.wikipedia.org/wiki/Help:Cheatsheet| well-documented]. | |||
To delete or add sections from your Populace page, you must be in the full-page editing screen (via the Edit button at the top of the page). Delete section headings where they begin with equal signs (=). Add section headings by surrounding a line of text with the appropriate number of equal signs, depending on the desired level of heading. | |||
==Final Notes== | |||
Feel free to add suggestions for anything else you would like to see added to this page on the Discussion tab, at the top of the page. | |||
Latest revision as of 07:49, 31 July 2025
Building Your Populace Page
To edit any page on the Unofficial Outlands Wiki, you will need to create an account and be logged in. Once you have done so, proceed.
From an Imported Wimble Entry
First, find your page. If you had a [Wimble Herald] entry as of July 26, 2025, a placeholder page has already been made for you.
To find your placeholder page, follow these instructions:
- In the searchbar at the top of every page, type in the name registered in Wimble, or a part of it, or your Wimble PersonID. Include any diacritic marks. Wiki is also particular about capitalization.
- There should be a list of results. Click on your page.
- If you have not edited your page yet, you should see something somewhat like this, except with your name at the top, and if available, your device as pulled from Wimble:

- Now you can edit individual sections, via the blue edit button next to each section title, or the entire page (including what is in the infobox on the right) via the Edit button at the top right of the page.

- You will now see a page with a text box, like so, if you clicked the Edit at the top of the page.

- Otherwise you will see a textbox with only the contents of the individual section you clicked edit for. In order to add or delete sections, you will need to use the whole-page edit link (the one at the top of the page). The instructions for either is otherwise the same.
- Important: Do not delete the section beginning {{Populace and continuing to the next set of }}. That will delete the entire side infobox. We would like to retain them for uniformity of Populace page layouts. You may remove individual sections within, if you like.
- For markup text tips and tricks, skip the next section and continue reading.
- Once you have edited your page to your heart's content, for the moment, do not forget to remove the import tag [[Category:Populace Not Filled]] from your page, as you have now filled it! You should find it between the Populace template brackets and the Introduction section, though Category tags may be added at any point within the page.
Without an Imported Wimble Entry
Please check for an imported page before creating a new page.
The simplest method for creating a new page for yourself is to link to it from your user page, save your new user page, then click the red text you've just created to create your populace page. The steps are similar.
- Clicking your (red or blue)username in the top right will lead you to either an editable text box (if your username was red) or your user page (if it was blue). Click edit on your page if it is there, otherwise go to the next step:

- Within double brackets, like so: [[here]], type your Populace page name (your SCA name), with correct spelling and diacriticals, as it should appear in Wimble Herald. Wiki is particular about capitalization, so be conscious of that as well. Save your user page changes.
- This will appear as red text in your user page. Click it to create your Populace page.
- Copy and paste in the following Populace template to create your side infobox:
{{Populace
 |photo = [[File:Photo needed.jpg|200px]]
 |photocaption = Caption Needed
 |title =
 |pronouns =
 |location =
 |status =
 |opid =
 |device = [[File:Device needed.jpg|200px]]
 |devicecaption = Heraldry Needed
 |awards =
 |offices =
 }}
- When/if you are added to Wimble Herald, your PersonID (found at the end of the URL for your page) can be copied into the opid field. Instructions for uploading image files for your photo (optional) and device can be found further down this page.
- If you so desire, copy and paste the source code (found after clicking Edit or View Source) from the Populace Boilerplate to help get you started with suggested sections and information to fill out.
Editing Your Populace Page
Uploading Images
- On the left side of the wiki, under the heading "Tools", is the text "Upload File".
- Your screen will look like this:

- Click the "Choose File" button and select the image you want to upload. In the "Destination Filename" text box, you may rename your image for display on the website. A reminder that all images will be publically viewable to anyone who visits the Outlands Wiki.
- Your screen will now look like this:

- Select and copy the "File:<filename>" at the top of the page - that is how you will display your images elsewhere.
- If the image is for the Populace Infobox, make sure to include " |200px" at the end of your file line, after the .jpg or .png (etc) to limit its size to 200 pixels. That will make sure it does not take over the page. As an example, all screenshot images on this page are limited to 500px with the same formatting.
Formatting Text
The Outlands Online unofficial wiki uses Wikitext markup language, which is well-documented.
To delete or add sections from your Populace page, you must be in the full-page editing screen (via the Edit button at the top of the page). Delete section headings where they begin with equal signs (=). Add section headings by surrounding a line of text with the appropriate number of equal signs, depending on the desired level of heading.
Final Notes
Feel free to add suggestions for anything else you would like to see added to this page on the Discussion tab, at the top of the page.